Table of contents
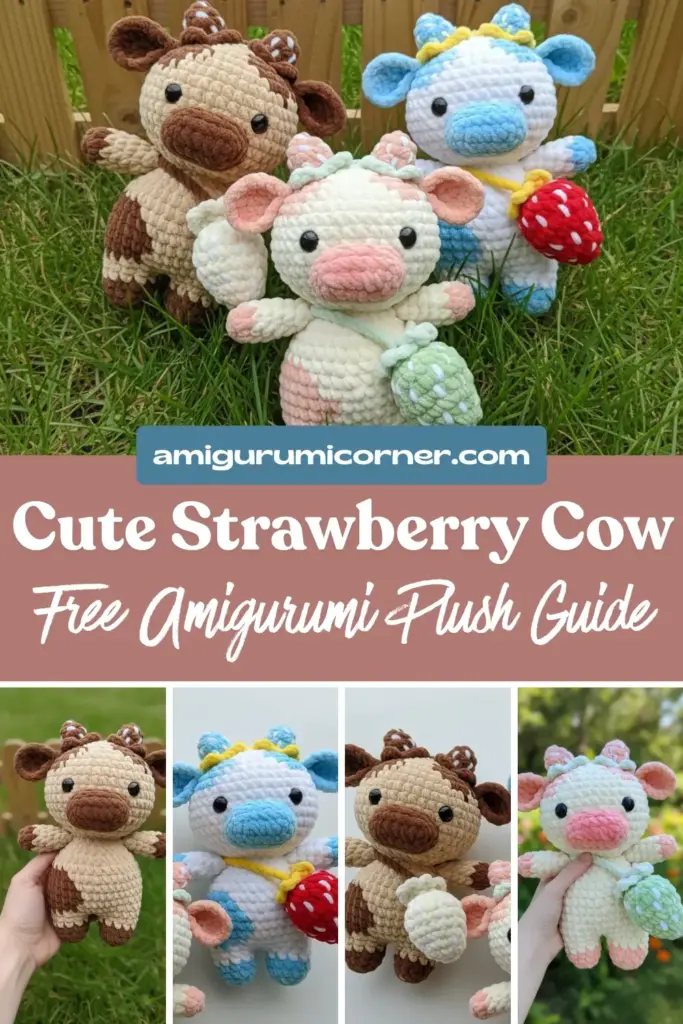
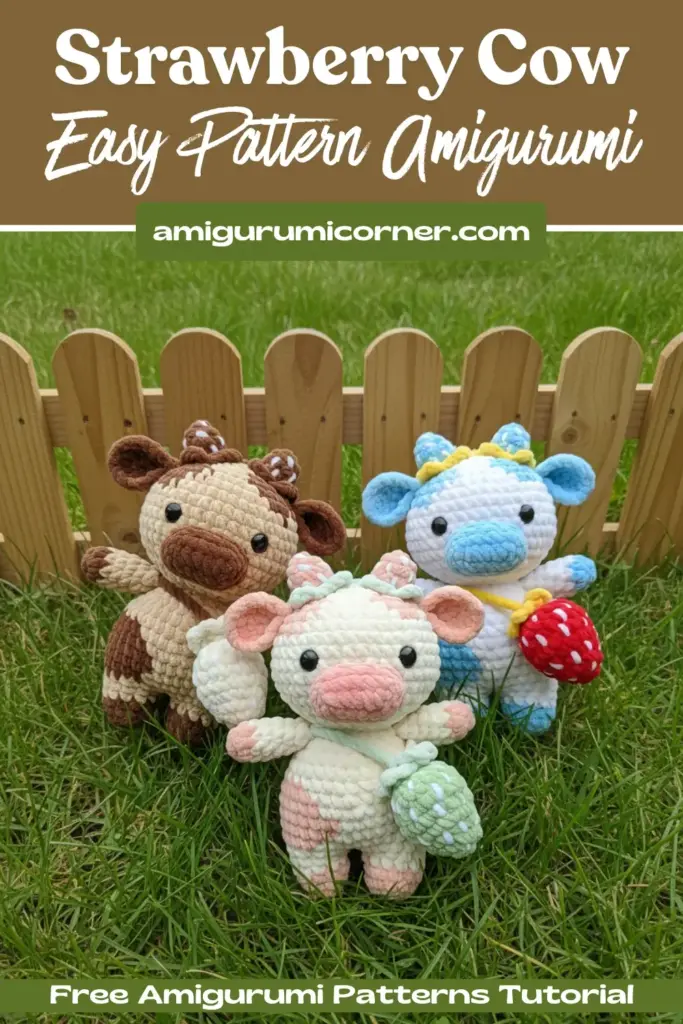
Looking for an irresistibly cute amigurumi project? This plush strawberry cow combines the sweetness of a classic farm animal with charming strawberry-themed details. Standing at 12 inches tall, this huggable toy makes the perfect handmade gift or room decoration. Whether you’re an intermediate crocheter or looking to expand your amigurumi skills, this detailed pattern will guide you through creating your very own strawberry cow companion, complete with pink spots, adorable horns, and even a tiny strawberry bag accessory!
Ready to Start Stitching?
Don’t lose this pattern! Pin it to your favorite crochet board and save it for your next cozy afternoon of making.

Materials You’ll Need
Before you begin, gather these materials:
- Main Yarn: HIMALAYA DOLPHIN BABY 131 yards / 3.5oz (120 m/100 g)
- Off-White color – 1 skein
- Pink color – 1/2 skein
- Green color – light green color – small amount
- Hook: Size 7 (4.5 mm)
- Safety Eyes: Black beads, 1/2 inch (12-14 mm) – 2 pieces
- Stuffing: Polyester fiberfill
- Notions:
- Transparent glue
- Sewing needle
- Black yarn for embroidery
- White sewing thread
- 5 pins
- Stitch markers
Notes:
- Using the specified materials will create a toy approximately 12 inches (30 cm) tall. Different yarn weights or hook sizes will alter the final size.
- These cows can be made in any colors you like! Feel free to customize and use your favorite color combinations
Abbreviations
- MR – magic ring (alternatively: make 2 ch and crochet 6 sc in the second chain from the hook)
- sc – single crochet
- ch – chain
- inc – increase
- dec – decrease
- sl st – slip stitch
- dc – double crochet
- tr – treble crochet
- (…) x N – repeat N times
Pattern Instructions
Legs (Make 2)
First Leg:
Crochet with pink color.
- 1 rnd: 6sc in MR (6)
- 2 rnd: inc*6 times (12)
- 3 rnd: (3 sc, inc)*3 times (15)
- 4 rnd: 15 sc, change the color to Off-White
- 5-7 rnd: 15 sc (3 rounds)
Fasten off and cut the yarn.
Second Leg:
- 1-6 rnd: repeat as for the first leg
- 7 rnd: 15sc, 1 ch
Do not cut the yarn, continue crocheting.
Arms (Make 2)
Crochet with pink color.
- 1 rnd: 6sc in MR (6)
- 2 rnd: inc*6 times (12)
- 3 rnd: 12sc, change the color to Off-White
- 4 rnd: (2sc, dec)*3 times (9)
- 5-8 rnd: 9sc (4 rounds)
Stuff only the bottom of the arm. Fold the detail in half and crochet 4sc, grasping the stitches of both edges. Fasten off and cut the yarn, hide the end.
Crochet the second arm in the same way.

Body
Then crocheting:
- 1 rnd: 15sc in the first leg, 1sc in ch, 15sc in the second leg, 1sc in ch (32)
- 2 rnd: (3 sc, inc) х 8 (40)
- 3-7 rnd: 40 sc (5 rounds)
- 8 rnd: (5 sc, dec) х 5, 5sc (35)
- 9 rnd: 35 sc
- 10 rnd: (4 sc, dec) х 5, 5sc (30)
- 11 rnd: 30 sc
- 12 rnd: (3 sc, dec) х 6 (24)
- 13 rnd: (2 sc, dec) х 6 (18)
Move the marker to the middle of the body, crochet sc to the marker. Attach the arms with pins on the sides of the body. In the next round crochet together the stitches of the body and arms.
- 14 rnd: 18 sc
Stuff the legs and body.
- 15 rnd: (1 sc, dec) х 6 (12)
Do not cut the yarn, continue crocheting.
Head
- 16 rnd: 12 inc (24)
- 17 rnd: (3 sc, inc) х 6 (30)
- 18 rnd: (4 sc, inc) х 6 (36)
- 19 rnd: (5 sc, inc) х 6 (42)
- 20 rnd: (6 sc, inc) х 6 (48)
- 21-24 rnd: 48 sc (4 rounds)
Move the marker to the middle of the head, crochet sc to the marker. In the next round, we begin to crochet pink spots, changing Off-White and pink yarn, leaving broaches inside the head. You can make spots of any shape, the main thing is to make 6 decreases in each round.
- 25 rnd: Off-White (6sc), pink (dec, 6sc), Off-White (dec, (6sc, dec) х 4) (42)
- 26 rnd: Off-White (4sc), pink (1sc, dec, 5sc, dec, 1sc), Off-White (4sc, dec, (5sc, dec) х 3) (36)
- 27 rnd: Off-White (3sc), pink (1sc, dec, 4sc, dec, 4sc), Off-White (dec, (4sc, dec) х 2, 2sc), pink (2sc), Off-White (dec) (30)
- 28 rnd: Off-White (2sc), pink (1sc, dec, (3sc, dec) х2, 1sc), Off-White (2sc, dec, 3sc, dec, 1sc), pink (2sc, dec) (24)
- 29 rnd: Off-White (2sc), pink (dec, (2sc, dec) х2, 2sc), Off-White (dec, 2sc), pink (dec, 2sc, dec) (18)
- 30 rnd: Off-White (1sc), pink (dec, (1sc, dec) х5) (12)
Fasten off and cut the Off-White yarn. Stuff the head.
- 31 rnd: pink 12 dec (6)
Cut the yarn, tighten the hole. Fasten the yarn, hide the end inside the head.
Snout
Crochet with pink color.
Ch 6
- 1 rnd: sc in 2nd ch from hook, 3sc, 3sc in last st, Underside: 3 sc, inc (12)
- 2 rnd: (3sc, 3inc) х 2 (18)
- 3 rnd: (3 sc, (1sc, inc)х 3) х 2 (24)
- 4-5 rnd: 24 sc
Crochet sl st. Fasten off and cut the yarn.
Ears (Make 2)
Crochet with pink color.
- 1 rnd: 6sc in MR (6)
- 2 rnd: 6 inc (12)
- 3 rnd: (1sc, inc) х 6 (18)
Crochet sl st, 1 ch. Fold the detail in half and crochet 2sc, grasping the stitches of both edges. Fasten and cut the yarn, leaving a tail for sewing.
Crochet the second ear in the same way.
Horns (Make 2)
Crochet with pink color.
- 1 rnd: 5sc in MR (5)
- 2 rnd: 5 inc (10)
- 3-4 rnd: 10 sc
Change the color to green.
- 5 rnd: (1sc, 4ch, 1sc) х 5
Crochet sl st. Fasten off and cut the yarn. Embroider grains with Off-White yarn.
Crochet two pieces in the same way.
Tail
Crochet with Off-White color.
- 12 ch, 11 sl st in 2nd ch from hook.
Cut the yarn, leaving the tails for sewing. At the end of the tail, make a brush with pink yarn (5-6 elongated loops), tie the ends with a knot, cut and burn.
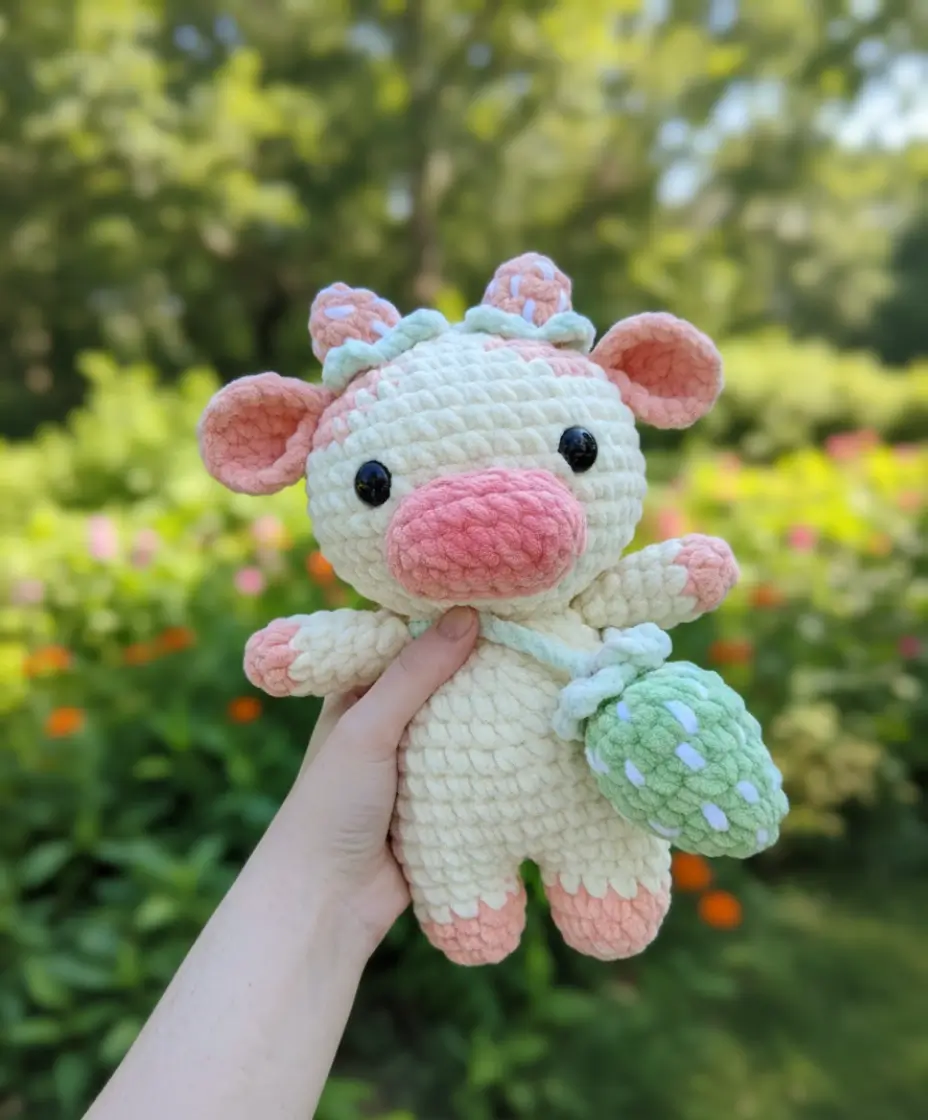
Strawberry Bag
Crochet with Green color.
- 1 rnd: 6sc in MR (6)
- 2 rnd: (1sc, inc) х 3 (9)
- 3 rnd: (2sc, inc) х 3 (12)
- 4 rnd: (3sc, inc) х 3 (15)
- 5 rnd: (4sc, inc) х 3 (18)
- 6-7 rnds: 18sc
- 8 rnd: (1sc, dec) х 6 (12)
- 9 rnd: 6 dec (6)
Change the color to light green color.
- 10 rnd: сrochet for the front loops only ((1sc, 4ch, 1sc) in one loop) repeat 6 times, sl st
- 11 rnd: сrochet for the back loops only of the 9th round 6sc
Crochet 30 ch, sl st. Fasten off and cut the yarn. Embroider grains with Off-White yarn.
Assembly Instructions
Now it’s time to bring your strawberry cow to life! Follow these steps carefully:
Attach the Eyes: Position the safety eyes between rounds 24 and 25, spacing them 9 stitches apart. Secure with glue. You can add black felt circles behind the eyes for extra definition.
Stuff Components: Carefully stuff the snout and horns with fiberfill.
Pin and Position: Use pins to temporarily attach all the details (ears, horns, snout, tail, and bag) to the body. This allows you to adjust positioning before permanently sewing.
Sew Details: Using a needle and Off-White strong thread, sew all pieces securely in place. The ears can be sewn using the leftover pink yarn tails.
Create Eye Tightening: For a professional finish, insert a needle with thread through the bottom of the snout into the eye area. Work through points as follows: through 1-2, then 3-4, and finally 5-6. Gently pull the thread to create small depressions around the eyes, then tie a secure knot. Hide the thread ends inside the head.
Embroider Features: Using thick black thread, embroider the nostrils on the snout, add eyelashes above the eyes, and create a sweet smiling mouth.
Bonus: Strawberry Hair Accessories
Transform your strawberry cow theme into wearable accessories! Here’s how to make adorable strawberry embellishments:
Crochet with pink color.
- 1 rnd: 5sc in MR (5)
- 2 rnd: 5 inc (10)
- 3 rnd: 10 sc
- 4 rnd: (4sc, inc) х 2 (12)
- 5 rnd: 12 sc
- 6 rnd: 6 dec (6)
Change the color to green.
- 7 rnd: (1sc, 4ch) х 5, sl st.
Stuff the detail. Cut the yarn, tighten the hole. Fasten the yarn, hide the end inside. Embroider grains with Off-White yarn.
Crochet two pieces in the same way. Sew strawberries to hair clips, headbands, or ponytail holders for matching accessories!
Frequently Asked Questions
This pattern is designed for bulky weight yarn like HIMALAYA DOLPHIN BABY. Using this yarn weight with a 4.5mm hook creates a 12-inch plush toy. If you substitute with a different yarn weight, your finished cow will be proportionally smaller or larger depending on the yarn thickness.
Absolutely! The pattern provides guidance for creating pink spots, but you have creative freedom with their placement and shape. The key is maintaining the decrease count (6 decreases per round) to keep proper shaping. Feel free to make your cow’s spots unique!
When switching between Off-White and pink yarn for the cow’s spots, leave the yarn broaches (floats) inside the head rather than cutting and weaving in ends constantly. This technique keeps the interior neat while preventing visible gaps in your color work. Just be careful not to pull the floats too tightly.
Position the eyes between rounds 24 and 25, spacing them exactly 9 stitches apart before securing. Use transparent glue for extra security, especially if the toy is for a young child. For added dimension, place small black felt circles behind the eyes before attaching them permanently.
Conclusion
Congratulations on completing your adorable strawberry cow! This charming plush toy combines classic amigurumi techniques with creative color-changing skills to create a truly unique piece. The sweet combination of cow spots transformed into strawberry patches makes this pattern perfect for gifts, nursery decor, or adding to your personal collection.
Don’t forget to make the matching strawberry bag and hair accessories to complete the strawberry-themed ensemble. Share your finished creation with fellow crocheters, and consider personalizing your cow with different spot placements or additional accessories. Happy crocheting, and may your strawberry cow bring smiles to everyone who sees it!
Ready to Start Stitching?
Don’t lose this pattern! Pin it to your favorite crochet board and save it for your next cozy afternoon of making.